Build a Linux server with Raid 1
Linux server with RAID 1, sometimes referred to as “Redundant Array of Independent Discs 1,” is a configuration for data storage used in computer systems. It is among the most fundamental and widely applied RAID levels.
For a redundant storage configuration, two or more discs are mirrored in RAID 1. An identical duplicate, or mirror, of the data kept on the other discs, is present on every disc in the array. In the RAID 1 array, this implies that each piece of data copied to one disc is concurrently written to all other discs.
Data redundancy and improved fault tolerance are the main goals of RAID 1. Because the data is still there on the remaining discs, the system can continue to operate even if one disc in the array fails. In this situation, the array will automatically recreate the mirror by transferring the data from the functional disc to the new one when the defective disc has been replaced.
RAID 1 does provide data security, however, it does not increase performance. Since data may be read from any disc in the array, read speed can be marginally enhanced, but write performance is unchanged from that of a single disc.
When data integrity and availability are crucial, such as with essential server applications, databases, or systems that cannot afford any downtime, RAID 1 is frequently employed.
RAID in hardware and software There are two varieties of RAID.
Hardware Raid
A storage device known as a hardware RAID is constructed from many hard discs. All discs show as a single SCSI disc in the system while connected. A standard SCSI disc and a Hardware RAID device are identical from a system perspective. A hardware RAID device can be used by the system as a single SCSI disc.
Hardware RAID has its own independent resources and disc subsystem. It makes no use of system resources like power, RAM, or CPU. Hardware RAID does not increase the system’s workload. Given that it has dedicated resources of its own, it offers exceptional performance.
Software Raid
With software RAID, the operating system takes care of managing the RAID array, including disk synchronization, data striping (dividing data across multiple disks), and mirroring (creating duplicate copies of data on different disks). This allows for flexibility and compatibility across different hardware configurations since the RAID functionality is provided by the software.
Basics of Linux Software RAID 1 Creation
- On your hard disc, you must first have a Linux distribution installed. This tutorial will use the moniker /dev/sda.
- Then, you’ll take two hard discs, designated in this post as /dev/sdb and /dev/sdc. The sizes of these two hard discs might vary. Before formatting your hard discs, don’t forget to back up your current data.
- On /dev/sdb and /dev/sdc, we’ll establish unique file systems next.
- And lastly, employ the mdadm tool to build the RAID 1 array.
Follow these setups to build a Linux server with Raid 1.
Format Hard Drive
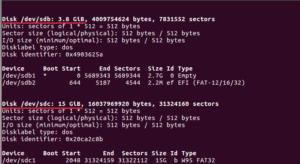
Open a terminal session on your Linux computer, insert two hard discs, then utilize the next command to confirm the device name.
sudo fdisk –l

My drives are, as you can see, /dev/sdb and /dev/sdc.
To create a new MBR partition table on the two hard drives, use the following two instructions. (Note that doing this will remove all data and partitions from these two hard discs. Make sure you have a backup of your data.)
sudo parted /dev/sdb mklabel msdos
sudo parted /dev/sdc mklabel msdos
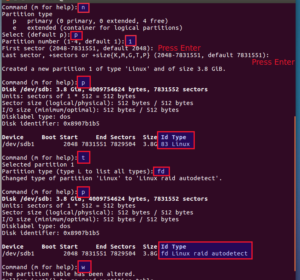
Next, format each drive with a fresh partition using the fdisk command, using a Linux raid autodetect file system. Do this first on /dev/sdb.
sudo fdisk /dev/sdb
Observe these guidelines.
- Type n to create a new partition.
- Type p to choose the primary partition.
- Type 1 to create /dev/sdb1.
- Use the Enter key to choose the default first sector.
- Press Enter to choose the default last sector. This partition will span the full CD.
- When you type p, information about the just created partition will be printed. The default partition type is Linux.
- Type t to change the partition type.
- Enter fd to switch the partition type to Linux raid autodetect.
- To confirm the partition type, press p again.
- Type w to make the changes mentioned above.

To build a Linux raid autodetect partition on /dev/sdc, use the same instructions.
Now we have two raid devices /dev/sdb1 and /dev/sdc1.
Install mdadm
MD (multiple devices) devices, often known as Linux software RAID, are managed by mdadm.
Debian/Ubuntu: sudo apt install mdadm
CentOS/Redhat: sudo yum install mdadm
SUSE: sudo zypper install mdadm
Arch Linux sudo pacman -S mdadm
Let’s investigate the two gadgets.
sudo mdadm –examine /dev/sdb /dev/sdc

As you can see, both are fd (Linux raid autodetect) devices. This command may be used to infer that /dev/sdb1 and /dev/sdc1 do not currently have a RAID configuration.
sudo mdadm –examine /dev/sdb1 /dev/sdc1
![]()
Create RAID 1 Logical Drive
To construct RAID 1, run the following command. The logical drive’s designation will be /dev/md0.
sudo mdadm –create /dev/md0 –level=mirror –raid-devices=2 /dev/sdb1 /dev/sdc1
We can now verify it using:
cat /proc/mdstat

We will that md0 is a RAID 1 configuration that is active. Use the instructions below to obtain additional information about /dev/md0:
sudo mdadm –detail /dev/md0
Run this command to get specific information for each raid device:
sudo mdadm –examine /dev/sdb1 /dev/sdc1
Create a File System on the RAID 1 Logical Drive
Format it with the ext4 file system.
sudo mkfs.ext4 /dev/md0
After that, mount the RAID 1 device by creating the mount point /mnt/raid1.
sudo mkdir /mnt/raid1
sudo mount /dev/md0 /mnt/raid1
To find out how much disc space is available, run this command.
df -h /mnt/raid1
Test
Let’s create a text file in /mnt/raid1 now.
cd /mnt/raid1
sudo nano raid1.txt
Write something like this.
This is a raid 1 device.
Save the document, then exit. Remove your drives from the computer after that, and then verify the RAID 1 device’s status again.
sudo mdadm –examine /dev/sdb1 /dev/sdc1
It is evident that /dev/sdc1 is not accessible. We can observe that one RAID device has been deleted if we examine /dev/md0.
sudo mdadm –detail /dev/md0
The text item is still present, though.
cat /mnt/raid1/raid1.txt
Run the following command to add the failing drive (in this example, /dev/sdc1) back to the RAID.
sudo mdadm –manage /dev/md0 –add /dev/sdc1
Then double-check the information:
sudo mdadm –detail /dev/md0
On /dev/sdc1, we observe that the RAID is recreating data. Additionally, you may view the rebuild status in the menu.
Keep in mind that you have to restore files to the RAID logical drive, not the physical drive, if you utilize disc backup software like Clonezilla.
It’s crucial to use the command below to preserve our RAID1 setup.
sudo mdadm –detail –scan –verbose | sudo tee -a /etc/mdadm/mdadm.conf
The configuration file for mdadm on various Linux distributions, including CentOS, is located at /etc/mdadm.conf. After executing the aforementioned command, you must execute the given command to create a fresh initramfs image.
sudo update-initramfs -u
Add the following item to the /etc/fstab file to have the RAID 1 logical disc automatically mounted when the computer boots up.
/dev/md0 /mnt/raid1 ext4 defaults 0 0
You might wish to use the x-gvfs-show option, which will enable you to view your RAID1 in the file manager’s sidebar.
/dev/md0 /mnt/raid1 ext4 defaults,x-gvfs-show 0 0
Remove the RAID
Use the command shown below to uninstall the RAID if you no longer wish to use it.
sudo mdadm –remove /dev/md0
The RAID specification should then be removed by editing the mdadm.conf file.
Additionally, be sure to change the /etc/fstab file and uncomment the line that allows the RAID device to auto-mount.
Final Thoughts
In this lesson, we learned how to use mdadm on Linux server with Raid 1 mirror array. We set up our software RAID using two bare 10 GB drives to take you through the steps. Finally, we discovered how to maintain the RAID array installed following a system restart.
These methods are simple to adapt to different scenarios and will assist you in dependably establishing new RAID configurations even if your environment is slightly different (for example, your array has more than two drives).
You can learn about linux more deeply by clicking the link below
https://linuxiron.com/what-is-linux-a-whole-introduction/
Learn about the linux commands by clicking the links below
https://linuxiron.com/echo-command-in-linux/
https://linuxiron.com/how-to-use-nice-renice-commands-in-linux/
https://linuxiron.com/how-to-use-kill-commands-in-linux/
https://linuxiron.com/a-beginners-guide-to-htop-for-process-management/
https://linuxiron.com/15-useful-yum-commands-in-linux/
https://linuxiron.com/how-to-use-the-top-command-in-linux/
https://linuxiron.com/17-ps-command-to-monitor-linux-process-with-examples-linuxiron/
https://linuxiron.com/12-cat-commands-in-linux-with-examples/
https://linuxiron.com/archiving-and-compressing-files-and-directories-in-linux/

